Showing posts with label amigurumi. Show all posts

Wednesday, 6 May 2015

CROCHET : Minion Doll

CROCHET : Minion Doll 


To make the Minion Doll: with Bright Yellow & F Hook
Ch2
Row 1. 6sc in the 2nd st from the hook.
Row 2. 2sc in each st-12sts.
Row 3 1sc, 2sc in the next st-18sts,
Row 4. 1sc in 2, 2sc in the next st-24sts.
Row 5. 1sc in 3, 2sc in the next st-30sts.
Row 6 1sc in 4, 2sc in the next st-36sts,
Row 7. 1sc in 5, 2sc in the next st-42sts.
Row 8. 1sc in 42sts
Rows 9-35. repeat row 8
Place safety eyes between 16th and the 17th row from the top.
Row 36. 1sc in 5sts, dec1sc-36sts.
Row 37. 1sc in 4, dec1sc-30sts.
Row 38. 1sc in 3, dec1sc-24sts.
Row 39. 1sc in 2, dec1sc-18sts.
Stuff
Row 40. 1sc, dec1sc until closed and FO.
 
To make the Goggles/Eyes: with Light Grey & C Hook (make 2)
With white felt cut-out small circles for the eyes, cut a small slit and slide safety eyes through the slits and the body of the doll. Sew the felt down, don't place them to close together. Make room for the goggles.
 
Make a ch long enough to fit around the eyes, join & Ch1
Work 1sl st in each st around and FO.
 
With some light grey thread tack the 2 ends together to make a circle.
Sew the two together with a few sts in the middle.
 
To make the Black Goggle Strap: make a ch long enough to reach around the body and to each side of the goggles, wk 1sc in each st around.

To make the Head Band: with Black D Hook
Ch21
Row 1. 1sc in each st & FO-20sts.
Attach White & ch3
Row 2. 3dc in each st across, ch3 & turn.
Row. 1dc in each st and FO.
Sew to the top of the head.
 
To make the Maid Out-Fit: with Black & F Hook
Ch36 join with a sl st and ch1
Row 1. 1sc in each st, join & ch1.
Row 2. 1sc, 2sc in the next st, join & ch1.
Row 3. 1sc in each st, join & ch1.
Rows 4-10. repeat row 3 and FO.
To make the Trim along the bottom: with White & D Hook
Attach White in any st in the back with a sl st, ch1
1sc in the first st, *1sc-1hdc-1sc-all in the same st*, 1sc in the next and repeat all the way around.
Attach yarn in the front/back of the Dress
Row 11. 1sc in 13sts, ch1 & turn.
Row 12. repeat row 11
Row 13. dec1sc, 1sc in 9, dec1sc, ch1 & turn.
Row 14. 1sc in 11sts, ch1 & turn.
Row 15. dec1sc, 1sc in 7, dec1sc, ch1 &  turn.
Row 16. 1sc in 9sts and FO.
Attach White to the front & back: 1sc in each st and FO.
To make Shoulder Straps: Attach Black in each corner of the Bib with a sl st with D Hook (make 2)
Ch22, 1sc in each st and FO.
Sew one end to the front and one to the back of the bib.
 
To make the Shoes and Legs: with White & F Hook (make 2)
Ch5 use a stitch marker
Row 1. 1sc in 3, 3sc, 1sc in 2, 2sc.
Row 2. 2sc, 1sc in 3, 2sc in 2sts, 1sc in 3, 2sc.
Row 3. 2sc, 1sc in 4, 2sc in 2, 1sc in 6, 2sc.
Row 4. 2sc in 2, 1sc in 6, 2sc in 2sts, 1sc in 8.
Row 5. 1sc in the FLO in each st.
Row 6. 1sc in 9, 1hdc in 8, 1sc in 5sts.
Row 7. 1sc in 10, dec1sc 4x, 1sc in 4.
Row 8. 1sc in 10, dec1sc 2x, 1sc in 4.
Row 9. 1sc, dec1sc 2x, 1sc in 5, dec1sc 2x, 1sc in 2 and FO.
With Yellow
Row 10. 1sc in the FLO in each st.
Row 11. 1sc in each st.
Rows 12-14. repeat row 11 and FO.
 
To make the Arms/Hands: with Yellow & D Hook (make 2)
Ch2
Row 1. 5sc in the 2nd st from the hook.
Row 2. 1sc in 5sts.
Rows 3-22. repeat row 2 and FO.
To make the Glove: with Black
Ch2
Row 1. wk 6sc in the 2nd st from the hook.
Rows 2-3. 1sc in each st.
Row 4. ch3, wk 1sc in the same st as ch3, 1sc in 5sts.
Row 5. 1sc in each st and FO,
Slide the yellow arms inside the black glove and sew in place.
 
To make the Apron: with White & D Hook
Ch48
Row 1. 1sc in 10sts, ch1 & turn.
Rows 2-5. repeat row 1
Row 6. dec1sc, 1sc in 6sts, dec1sc, ch1 & turn.
Row 7. dec1sc, 1sc in 4sts, dec1sc and FO.
Reattach yarn on the side of the apron that has a long strand with a sl st, ch3 wk 1sc in the next st repeat all the way around. When you get to the end ch37 and FO.
Tie the apron around doll.

Friday, 17 April 2015

Koala Amigurumi

craftpassion.com

Koala Amigurumi

koala amigurumi
Crochet Pattern for Amigurumi Koala bearFollow the crochet pattern in the Woman’s Day website to crochet all the parts of the koala, which consist of:
1 head (stuff firmly and complete)
1 body
1 nose
2 ears
4 limbs
Remember to leave a long yarn end (about 6-8″) for every part so that you will have enough yarn to sew.
You need 2 black beads (I used about 5.5mm or 7/32″ to match the size of the head I crocheted).
Tapestry needle and scissor.

Crochet Pattern for Amigurumi Koala BearFind the appropriate positions for the ears, approx at the center of the vertical cross section of the head, middle of the height.
Crochet Pattern for Amigurumi Koala BearSew to attach the nose in the center between the 2 ears.
Sew eyes 2 stitches away from the nose.

Crochet Pattern for Amigurumi Koala BearStuff the body firmly and sew it to the bottom of the head.
Crochet Pattern for Amigurumi Koala BearLastly, stuff and sew the limbs to the body. ~~Done~~
koala amigurumi
http://www.craftpassion.com/2010/11/crochet-koala-bear-amigurumi-tutorial-pattern.html/2

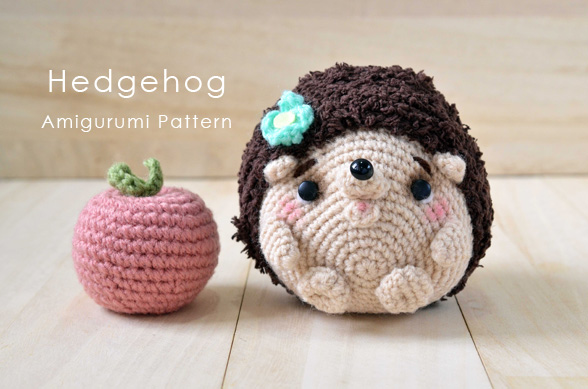
Hedgehog Amigurumi Pattern

craftpassion.com

Hedgehog Amigurumi Pattern

hedgehog amigurumi free pattern
Hedgehog Amigurumi: Mimi-chan
by amiguruMEI for Craft Passion
Skill level: Intermediate
Duration: About 5 hours
Description: Mimi-chan (short for Ayumi) is a baby hedgehog who loves watching the autumn leaves fall. Her weakness? Sweet, ripe apples. She enjoys clambering from tree to tree. She hopes she will grow up to become a bushy-tailed squirrel :)
Abbreviations
• Ch: chain
• Sc: single crochet
• Dc: double crochet
• Dtr: double treble crochet
• Inv dec: invisible decrease
Materials
2.3mm hook
2.5mm hook
Acrylic yarn in beige, dark brown and sea green
Fuzzy yarn in dark brown (I used Daiso’s Moco CafĂ© Fuwa Fuwa yarn)
White and yellow felt
2 x 8mm black brads
1 x 8mm doll’s eye
Dark brown eye shadow
Pink blush
Cotton buds
Darning needle
Polyester fiberfill
Stuffing pellets
Body
With beige yarn:
Round 1: Sc 6 in magic ring {6}.
Round 2: [Inc] around {12}.
Round 3: [Inc, sc 1] around {18}.
Round 4: [Inc, sc 2] around {24}.
Round 5: [Inc, sc 3] around {30}.
Round 6: [Inc, sc 4] around {36}.
Round 7: [Inc, sc 5] around {42}.
Round 8: [Inc, sc 6] around {48}.
Round 9: [Inc, sc 7] around {54}.
Round 10: [Inc, sc 8] around {60}.
Round 11-14 (4 rounds altogether): Sc around {60}.
Change to dark brown yarn. (I used a slightly thicker yarn and a 2.5mm hook to match)
Round 15-20 (5 rounds altogether): Sc around {60}.
Round 21: [Inv dec, sc 8] around {54}.
Round 22: [Inv dec, sc 7] around {48}.
Round 23: [Inv dec, sc 6] around {42}.
Round 24: [Inv dec, sc 5] around {36}.
Round 25: [Inv dec, sc 4] around {30}.
Round 26: [Inv dec, sc 3] around {24}.
Round 27: [Inv dec, sc 2] around {18}.
Turn the beige part of the body towards you. This means the opening should be to the back of the doll, instead of at the bottom.
Fill with plastic pellets. This is to weigh down the doll.
Add stuffing. At this point, start shaping the doll as you would a triangle onigiri (rice ball).
Round 28: [Inv dec, sc 1] around {12}.
Round 29: [Inv dec] around {6}.
Fasten off and weave in ends.
Eye indentations
With a new strand of beige yarn, thread it through a darning needle and bring it up to a spot below Round 9 of the head.
Make a horizontal backstitch and bring the yarn back down to the bottom of the body. Gently tug to create an indentation. Repeat on the other side. There should be about 10 stitches in between.
Bring yarn to the bottom of the head and trim excess.
Snout
With beige yarn:
Round 1: Sc 5 in magic ring {5}.
Round 2: [Inc] around {10}.
Round 3: Sc around{10}.
Fasten off and leave a long tail for sewing.
Lips
With beige yarn:
Round 1: Sc 5 in magic ring {5}.
Fasten off and leave a long tail for sewing.
Ears
Make 2 with beige yarn:
Round 1: Sc 7 in magic ring {7}.
Round 2: Sc around{7}.
Fasten off and leave a long tail for sewing.
Arms
Make 2 starting with beige yarn:
Round 1: Sc 7 in magic ring {7}.
Round 2-5 (4 rounds altogether): Sc around {7}.
Fasten off and leave a long tail for sewing.
Feet
Make 2 starting with with beige yarn:
Round 1: Sc 6 in magic ring {6}.
Round 2: [Inc] around {12}.
Round 3-4: Sc around{12}.
Round 5: Inv dec around {6}.
Fasten off and leave a long tail for sewing.
Flower
With sea green yarn:
Round 1: Ch 4. Slip stitch to first st to form a ring.
Round 2: *[Ch 3, 2 dtr, ss] repeat from * 3 more times. (4 petals altogether)
Fasten off and leave a long tail for sewing.
Creating fuzzy hedgehog quills
With dark brown fuzzy yarn, surface crochet with sc onto the dark brown part of the body. Using fuzzy yarn means it’s okay to make a mistake, since it won’t be immediately visible.
Crochet around as you normally would in a spiral fashion and ensure you cover the entire back with fuzz.
Assembly
1. Cut two pieces of white felt into small crescents to match the size of the black brads.
2. Glue the brads and white felt in place as the eyes.
3. Insert the doll’s eyes (used as a nose here) into the snout piece and sew the snout in place.
4. Sew on the lips.
5. Sew on the arms, feet and ears.
6. Use dark brown yarn to make eyebrows with the backstitch technique.
7. Glue a small yellow felt circle onto the centre of the flower.
8. Use dark brown eyes shadow to give the eyes some depth and dimension. Apply with the help of a cotton bud.
9. Dab on some pink blush on the cheeks and the small centre of the lips.
hedgestep1While you fill the body with stuffing, start shaping the doll as you would a triangle onigiri (rice ball).
Hedgestep2Add eye indentations.
Hedgestep3Sew on the snout and lips after gluing on the eyes in place.
Hedgestep4Sew on the ears, arms and feet.
Hedgestep5Use fuzzy yarn to create hedgehog quills.
Hedgestep6Highlight features with dark brown eye shadow and pink blusher.
hedgehog amigurumi pattern
http://www.craftpassion.com/2014/08/hedgehog-amigurumi-pattern.html/2

click here

Followers