Showing posts with label flower. Show all posts

Tuesday, 28 April 2015

Crochet Flower Bracelet

petalstopicots.com

Crochet Flower Bracelet

Crochet Flower Bracelet | www.petalstopicots.com | #crochet #flower #bracelet #jewelry #pattern

Crochet Flower Bracelet

Here’s what you need:
  • Size 10 crochet thread
  • 2 mm steel hook
  • Sewing needle
  • Jewelry closure
Click here to reference the Crochet Abbreviations Chart.


Since my bracelet is for a little girl, I only made 5 motifs. Make the number you would need to fit around the wrist of your intended wearer.
Here is the pattern to work the flowers, but see below for different joining options before you get started.
Ch 6, join with Sl st in furthest ch from hook to form a ring.
Round 1: Ch 1 (does not count as st), work 16 scs into ring, join in 1st sc of round — 16 scs.
Round 2: Ch 1 (does not count as st), beginning in same st as join, *work [1 sc, ch 3, 1 sc], skip next st, rep from * 7 more times, join in 1st sc of round — 8 ch-3 spaces.
Round 3: Ch 1 (does not count as st), work 5 scs in each ch-3 sp around, join in 1st sc of round — 40 sts.
Fasten off.

Joining

To join the flowers into a bracelet, you can simply make all your motifs and then sew them together with a needle and thread or you can use the join as you go method (JAYGO).
To use the JAYGO method, complete your first flower as indicated above. But for your second flower and each after that, repeat Rounds 1 and 2 as above but work Round 3 as follows:
Round 3: Ch 1 (does not count as st), *work 5 scs in next ch-3 sp, repeat from * 5 more times,  **in next ch-3 sp [work 2 scs, drop loop from hook and insert into 3rd st of petal on the flower you want to join it to and pull through the loop, continue working 3 sc in same ch-3 sp], repeat from **   for final petal, join in 1st sc of round — 40 sts.
Fasten off.
Using a sewing needle and your thread, sew bracelet closures to each side of your bracelet. Weave in all ends securely.
Crochet Flower Bracelet | www.petalstopicots.com | #crochet #flower #bracelet #jewelry #pattern

Friday, 17 April 2015

Patterns: Crochet Flower Brooches

lovestitches.blogspot.comPatterns: Crochet Flower Brooches

Hello everyone!

Thank you very much for making my day with all your sweet words on my flower brooches and my posts so far! That really meant a lot to me, I do appreciate!

I made these flowers using some patterns from Japanese books and they are all in chart form. I've just "translated" them into US term for your convenience (as I guess most of you may prefer written patterns, hoping I'm right!). So, here you go - please let me know if there's any mistake:
1. Cream daisy flower: 
(Make two alike in different colors)

Magic circle. 
Round 1: 5 sc in the loop. Do not join.
Round 2: 2 sc in each stitch around (10 sc)
Round 3: 1 sc in the next stitch, 2 sc in the next stitch (15 sc in total)
Round 4: * Slip stitch to the next sc, ch 2, 4 dc in the next stitch, ch 2, slip stitch to the next stitch to complete the first low petal. Repeat from * for the remainder (5 petals in total).
Round 5: * Slip stitch to the 1st chain of the first ch-2, sc in the next chain, work 1 hdc in the first dc, 1 dc in the same stitch, dc increase in each of the next 2 stitches, 1 dc in the 4th dc, 1 hdc in the same stitch, sc in the next ch-2 space, sl st in to the previous sl st. Repeat from * for the remainder.
Round 6: * Sc in the next sl st, ch 2, 3 dc increase in the next 3 stitches, 1 dc in the next st, 1 hdc in the same stitch, 1 hdc in the next stitch, 1 dc in the same st, 3 dc increase in the next 3 stitches, ch 2, sc in the previous sl st. Repeat from * for total of 5 petals. 
Cut the tail, fasten off and weave in ends.

Use a contrast colored thread to sew 2 layers together with petals are alternate to each other. Sew the center as it looks like in the picture. 

Crochet a tiny flower to sew it in the center (magic circle, * ch 5, sl st into the loop. Repeat 4 times from * to finish) or just simply sew a button in center to complete the pistil.

2. Other daisy flower in Orange: 

Magic circle, 
Round 1: Ch 3 (count as the first dc), 15 dc in the loop, join with sl st to the first ch 3. (16 dc)
Round 2: Work in back loop only: 2 dc in each dc around (32 dc)
Round 3: Ch 1, sc in the same stitch, ch 5, sc in the next stitch, *sc in the next stitch, ch 5, sc in the next stitch (16 ch-5 spaces in total).
Round 4: * Slip st to the ch-5 loop, ch 2, work 9 dc in the ch-5 loop, ch 2, sl st into the loop. Repeat from * for the remaining loops. (16 petals in total)
Cut the yarn and fasten off.
Round 5: Join new thread to the front loop created at round 2, repeat the instruction for round 3.
Round 6: repeat round 4.
Fasten off.

Make a tiny flower (magic circle, * ch 9, sl st into the loop. Repeat 9 times from * to finish) to sew in center. Add button in center to make the pistil look a bit different.

3. Colorful flower with many layers of petal:
Magic circle,
Round 1: Ch 1, 16 sc in the loop. Join with a slip stitch to the first sc.
Round 2: Ch 1, sc in the same stitch, ch 3, skip one sc, * sc in the next stitch, ch 3, skip 1 sc. 
Repeat from * for the remainder. Join with a sl st to the first sc (8 ch-3 loops in total).
Round 3: ch 1, * 1 sc, 1 hdc, 1 dc, ch 2, 1 dc, 1 hdc, 1 sc into the loop. Repeat 7 times total from * (8 petals total)
Round 4: ch 1, * front post single crochet around the first sc in round 2, ch 4. Repeat 7 times total from *. Join with sl st to the first FPSC (8 ch-4 loops in total)
Round 5: ch 1, * 1 sc, 1 hdc, 2 dc, ch 2, 2 dc, 1 hdc, 1 sc into the loop. Repeat 7 times total from *.
Round 6: ch 1, * front post single crochet around the previous FPSC in round 4, ch 5. Repeat 7 times total from *. Join with sl st to the first FPSC (8 ch-5 loops in total)
Round 7: ch 1, * 1 sc, 1 hdc, 3 dc, ch 2, 3 dc, 1 hdc, 1 sc into the loop. Repeat 7 times total from *.
Round 8: ch 1, * front post single crochet around the previous FPSC in round 6, ch 6. Repeat 7 times total from *. Join with sl st to the first FPSC (8 ch-6 loops in total)
Round 9: ch 1, * 1 sc, 1 hdc, 3 dc, 1 tr, ch 2, 1 tr, 3 dc, 1 hdc, 1 sc into the loop. Repeat 7 times total from *.
Round 10: ch 1, * front post single crochet around the previous FPSC in round 6, ch 6. Repeat 7 times total from *. Join with sl st to the first FPSC (8 ch-6 loops in total)
Round 11: ch 1, * 1 sc, 1 hdc, 4 dc, 1 tr, ch 2, 1 tr, 4 dc, 1 hdc, 1 sc into the loop. Repeat 7 times total from *.

Complete this pattern you will have 5 layers of petal, change color for each if desired.

*** To turn them into a brooch or a hair scunchi:
Cut a circle of felt fabric or crochet a circle with sc for 7 rounds and sew in place in the back of the flower.
Here is a pattern for a circle just in case: 

Magic circle,
Round 1: Ch 1, 8 sc in the loop. Do not join.
Round 2: 2 sc in each sc around (16 sc). Mark the first sc with a contrasting color maker.
Round 3: 1 sc in the next stitch, 2 sc in the next stitch (24 sc)
Round 4: sc increase in every 3 stitches (30 sc)
Round 5: sc increase in every 4 stitches (36 sc)
Round 6: sc increase in every 5 stitches (42 sc)
Round 7: sc increase in every 6 stitches (48 sc)
Round 8: sc increase in every 7 stitches (54 sc) 
Skip 1 stitch, slip stitch to the next stitch to join.
  
Attach a brooch pin if you want to have a brooch, or a pony tail if you  want to have a hair brunchi.

  
 ♥ Enjoy, and Happy hooking!!!


 Thank you for stopping by, hope you all a very Happy Weekend!!! ♥
http://lovestitches.blogspot.com/2011/08/patterns-crocheted-flower-brooches.html

Butterfly, Flower & Leaf Crochet Pattern

craftpassion.com

Butterfly, Flower & Leaf Crochet Pattern

crochet pattern butterfly flower leaf
Butterfly, Flower & Leaf Crochet Pattern
Difficulty Level: Beginner, must know how to crochet ch, sc, dc, tr & slst.
Materials & Tools:
For crochet butterfly, flower & leaf
1. DMC perle cotton thread #8 (double strand) or cotton lace thread #20, various colors
2. Crochet hook: 1.5 mm
3. Tapestry Needle # 22
4. Scissors
Others
5. Sewing kits
6. Hot glue gun
7. Photo frame, felt or photo, Burlap / hemp cloth, ribbon
8. Clothes pin
9. Hair clips
10. Brooch pin & small piece of felt
Abbreviations:
ch = chain
sc = single crochet
dc = double crochet
tr = treble or triple crochet
st = stitch
slst = slip stitch [see important note]
sl knot = slip knot
fo = fasten off
IMPORTANT NOTE: if not specify where to do the tr, dc or slst, do it on the same st.
The color inside { } is only for the pattern reference, you can mix and match what ever colors you want and get some surprises with your creation.
crochet butterfly patternButterfly Crochet Pattern:
{blue} Begin with a sl knot of approx 3″ tail.
r1 – ch2, sc6 on 2nd st from hook, slst to the first ch to make a ring.
{yellow} Insert the hook at the last st of r1, yarn-over to make a loop as the beginning st of r2.
r2 – [forewing: slst on next st, ch4, tr2, tr1 on next st, ch4, slst.] [hindwing: *slst on next st, ch3, dc, [tail: ch3, slst on the loop of dc st], ch3, slst, repeat * 2 times.] Repeat forewing pattern to complete the butterfly. fo & leave approx. 3″ to make antennae.
[Antennae] Tie 2 yarn ends to make a knot, trim away excess yarn. Repeat the same for the other antennae.

crochet flower patternFlower Crochet pattern:
{white} Begin with a sl knot of approx 3″ – 4″ tail.
r1 – ch2, sc6 on 2nd st from hook, slst to the first ch to make a ring.
{orange pink} Insert the hook at the last st of r1, yarn-over to make a loop as the beginning st of r2.
r2 – *slst on next st, ch3, dc, ch3, slst, repeat * 6 times to make 6 petals. fo & leave approx. 3″ – 4″ tail

crochet leaf patternLeaf Crochet Pattern:
{green} Begin with a sl knot of approx 4″ tail.
r1 – ch9.
r2 – sc1 on the 2nd st from hook, hdc1, dc3, hdc1, sc1, slst on the last ch st, turn and work on the other loop of the base ch. ch1, slst on 1st st, sc1, hdc1, dc3, hdc1, sc1, slst. fo & leave approx 4″ tail.
Use tapestry needle to bring the yarn end to the starting side of the leaf through midrib.

crochet Butterfly Flower Leaf patternPlan your design and determine the quantities and colors of each butterfly, flower & leaf you need for your project.
sew crochet flower bouquetFor Photo Frame:
Cut burlap or hemp cloth and fringe the edges by removing a few warps’ and wefts’ thread.
Position the flowers and leafs, secure them with pin.
Sew or glue them with hot glue. I prefer sew because the burlap could be too weak to hold the flower in place with glue.

crochet flower bouquet patternTie a ribbon and sew it on the “stems” of the flowers and leafs.
position & glue the motif on the felt or photo’s plastic cover or on the frame of your photo frame.
If you want to put photo in the frame, position the motif away from the main display area so that it won’t block your beautiful photo. Glue some butterflies and flowers to decorate.

 crochet clothespin flower patternFor Clothes Pin & Hair Clips:
Make a knot on the yarn tails at the back of the crochet flower, trim away the excess yarn but not too near to the knot. Glue the flower on the clothes pin with hot glue.
Do the same to hair clip, hair barrette, bobby pin, hair claw, hair band, bun holder etc…

crochet flower bouquet patternFor Flower Bouquet Brooch:
Crochet 8 flowers, sew them together from behind and minimize the appearance of stitches in front. Use similar sewing thread color to camouflage the stitches within the bouquet just in case they did showed up on the front.
Take 2 yarns from behind to the front and tie a knot to secure the “stems” in place just like a flower bouquet.

crochet flower brooch materialA brooch pin and a small piece of felt enough to cover the back of the pin.
crochet flower brooch pin tutorialSew brooch pin to the back of the flower bouquet, again, try not to show any stitches in front.
crochet flower brooch backCover the back of the brooch pin with a small piece of felt either by gluing or by sewing along the edges.
crochet flower & butterfly hair clips
http://www.craftpassion.com/2011/04/crochet-butterfly-flower-leaf-pattern-tutorial.html/2

Crochet Pattern: 5-Petal Flower

craftpassion.com

Crochet Pattern: 5-Petal Flower

5 Petals Flower main
Crochet Pattern: 5-Petal Flower
pattern sheet
Click image to get free pattern in downloadable and printable PDF file
If you don’t have acrobat reader to view the pdf file, get it here.
Abbreviations:
ch = chain
sc = single crochet
st = stitch
sl knot = slip knot
slst = slip stitch
flo= front loop only
hdc= half double crochet
dc = double crochet
fo = fasten off
Materials:
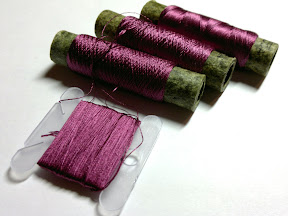
1. Yarn (suitable for 3mm crochet hook)
2. 3mm crochet hook
3. Small amount of poly-fill
4. Decoration rhinestones and beads
5. Elastic hairband and brooch pin
Finished dimension:
approx. Diameter 115cm (4.5”)
Crochet Pattern:
Make 2 – front layer and rear layer
Center
beg sl knot
r1 – ch10, join with slst on the first ch to form a base ring
r2 – ch1, 15sc in ring, join with slst on first ch to complete r2
Petals (5 clusters)
**r1 – ch16, turn
r2 – sc in 2nd ch from the hook, sc in next 2 chs, hdc in next ch, dc in next 7 chs, hdc in next ch, sc in next 3 chs, sc flo onto the 1st (4th, 7th, 10th, 13th) st of the centre ring, turn
r3 – sc in 2nd st on the petal, sc in next st, hdc in next st, dc in next 9 sts, hdc in next st, sc in next 2 sts, turn
r4 – sc in next st,  hdc in next st, dc in next 9 sts, hdc in next st, sc in next 3 sts, sc flo onto the 2nd (5th, 8th, 11th, 14th) st of the center ring, turn
r5 – sc in next st on the petal, sc in next st, hdc in next st, dc in next 9 sts, hdc in next st, sc in next 2 sts, turn
r6 – sc in next st, sc in next 2 sts, hdc in next st, dc in next 7 sts, hdc in next st, sc in next 3 sts, sc flo onto the 3rd (6th, 9th, 12th, 15th) st of the center ring, turn**
Repeat ** 5 times to make 5 petals
fo and hide the yarn end into the flower.
Join
Join the 2 layers of petals by single crochet the outer row together. 15sc on side, 3sc on tip, 15sc on side again, move on to the next petal. Stuff small amount of poly-fill into the petals before completely join-up both layer. Repeat 4 times for the other 4 petals.
Decoration
Sew some rhinestones and beads onto the petals to decorate it. Sew the elastic band and attach the brooch pin at the back of the flower to make it into hairband-brooch combo.
Note: The yarn I am using is woven type acrylic fiber which has a little elasticity and will not fray, you can try other yarn to create a different style on it.
crochet1Get ready to crochet the petal.
crochet2Make 16 chains follow the pattern to crochet row 2 until you reach “flo” instruction.
crochet3flo – Front loop only.This is the single crochet of the front-loop-only of the center ring. I used the front loop for layer 1, and reserved the back-loop for the layer 2 of the petal.
crochet5This is 1 layer of 5 petals and I am ready to make the second layer by using another loop of the stitch.
crochet6This is the rear side of the 1st layer. See the loop that I reserved (yellow pointer), now I am going to use this loop to crochet the layer 2 of the petal.
crochet7Completed first petal that has 2 layers :)Continue to crochet the rest until you have all 5 petals for layer 2.
crochet8Time to join-up both layer with single crochet the outer row along the petal.
crochet9Stuff some small amount of poly-fill to make the flower a little filling to add dimension to it. Continue to crochet until you reach the end of the petal, move on to the next petal. Skip the stitch that crocheted on the center ring.
5 Petals Flower 2
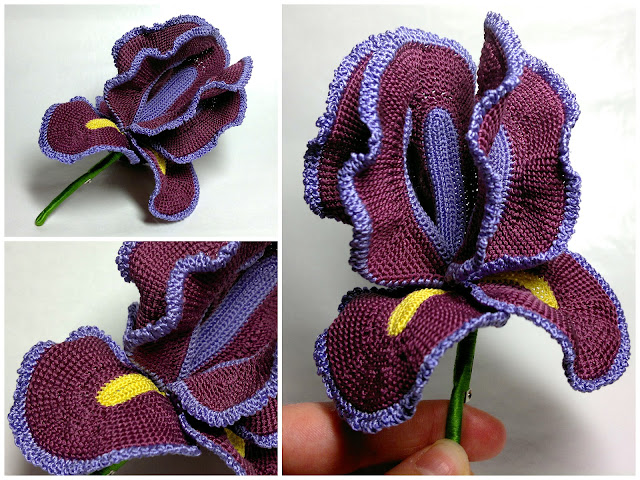
Now you have completed the bare 5-petal flower, you can decorate it with beads and rhinestones to glamorize it (like the blue one I have made).
Attach an elastic hairband and a brooch pin at the rear side of the flower by hot glue, and the flower is ready to charm your apparel.
Have fun making one today!!!!
more pattern click here http://www.craftpassion.com/2009/08/crochet-pattern-5-petal-flower.html

Crochet Swirls

zoomyummy.com

Crochet Swirls (Tutorial)

crochet swirl free pattern by zoomyummy.com
crochet swirl applique free pattern by zoomyummy.com
Here’s what you need.
Two yarns of different color – the bulkier the yarn the bulkier the swirl.
You also need one hook that will work well with your yarns, a needle and a pair of scissors.
Let’s pretend that is not a hair cutting scissors.
Please.
crochet swirl applique free pattern by zoomyummy.com
The whole swirl has only four rows. This is the first one:
1. Row: 43 ch (ch = chain stitch).
2. Row: 1 dc (dc = double crochet stitch) into the fourth chain stitch from the hook, 1 dc into each remaining chain stitch.
3. Row: 3 ch, 1 dc into the first stitch from the hook, 1 dc in next stitch, 2 dc into next stitch, *1 dc in next stitch, 2 dc in following stitch*, repeat *…* till the end of the row.
4. Row: with a changed yarn color, 2 ch, 1 sc (sc = single crochet stitch) in the first stitch, 1 ch, *1 sc in next stitch, 1 ch*, repeat *…*.
Finish off.

You have just created a funny curly strip.
Now twist the strip into a nice shape.
Using a needle and some yarn, sew some stitches in the middle and along the edges only to fixate the whole swirl.
I made only three stitches and that was it.
I can imagine these on scarves, slippers, headbands or as a brooch even.
Hopefully, I didn’t break your brain.
Enjoy, dear friends!
Love,
Petra http://zoomyummy.com/2011/01/11/crochet-swirls-tutorial/

Flowery Granny Square – Crochet Pattern

www.coffeeandvanilla.com

Flowery Granny Square – Crochet Pattern

granny square with a flower

MATERIALS

  • yarn

EQUIPMENT

  • crochet hook (I used 4.00 mm one)

METHOD

stitches used: chain (ch), double crochet (dc), slip stitch (sl), puff stitch (ps), triple crochet / treble (tr), cluster stitch (cl)
magic crochet circle
FOUNDATION CHAIN
Start with 6 ch, close the chain with sl to create a circle.
step by step granny square with flower
ROUND 1 (FOUNDATION ROUND)
  • To start the new round work 3 ch as 1 dc and then 15 more dc stitches, close round with sl.
  • Connect another colour and work puff stitch into each dc from previous round. Close the round with sl.
To create puff stitch yarn over (yo), insert the hook into foundation stitch, yo draw up a loop, repeat 3 times into the same foundation stitch, the last time draw the yarn though all 7 loops on a hook, finish with ch 1. You can also make the puff even more puffy creating loops 4 instead of 3 times.
petal granny square pattern
ROUND 2
  • Change colour of the yarn.
  • Work cluster stitches (cl) into each space between puff stitches from the previous round, starting with 2 ch instead first dc in the cluster.
To create double crochet cluster stitch work 3 dc but only half way, do not finish them leaving yarn on the hook (you should have 4 loops) and then close all 3 dc in one go. To finish the cluster work 1 ch extra and move to the next space in between puff stitches to work another cluster.

sunburst granny square pattern
ROUND 3
  • Connect another colour and work 3 ch as 1 dc and 2 more dc into one of the spaces between clusters from the previous round, ch 1 and again 3 dc into another space. Repeat until you have 3 sets of 3 dc.
  • To make a corner work 3 tr 2 ch 3 tr into one space.
  • Ch 1 and again work 3 sets of 3 dc until you will reach another corner.
  • Close the round with sl.
ROUND 3+
  • Repeat round 3 as many times as you need to achieve required size of the square.

NOTES

Please note that by mistake on the final and first image I used different colour of the yarn in round 3 than in the step by step images.
I used this granny square pattern to make boho style bags for my daughters. In one of them I made granny squares larger adding circle of 3 dc, 1 ch, 3 dc, 1 ch etc. in round 3 before making it square in the round 4.
boho style granny square bag

Tuesday, 14 April 2015

Iris hook


Iris hook:

Iris crocheted 0.5 out of thin silk three addition. Threads with coils is convenient to rewind to the plastic spools for sewing .
For outer petals yellow thread dial 22 VI. Starting from the third loop from the hook knit to the end of 20 stbn. Open knitting: knit 20 stbn with end parts (the jumper from the EP) 3 stbn knit, knit 20 stbn. Open knitting: knit 20 stbn, then 3 times for 2 stbn in one loop, then 20 stbn. Open knitting; attach to the edge of the wire and tie detail stbn (should have 46 columns). Attach thread burgundy. Knit 1 stbn. Next Tunisian knit technique (photo 2). In the last number of typesetting - Corner - loop is pulled out of the yellow column details.

click here

Followers